BMP180 Atmospheric Pressure Sensor interfaced
with Arduino, Node MCU, ESP32 with LCD display
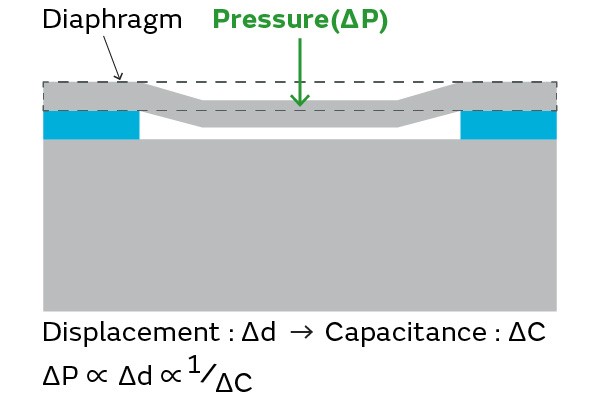
Barometric pressure sensors detect atmospheric pressure values and height changes and are used in smartphones, smartwatches, drones, etc. Current barometric pressure sensors are prevalent in a wide variety of products that use MEMS (Microelectromechanical System) technology. Barometric pressure sensors that use MEMS fall into two main categories, piezoresistive and capacitive types.
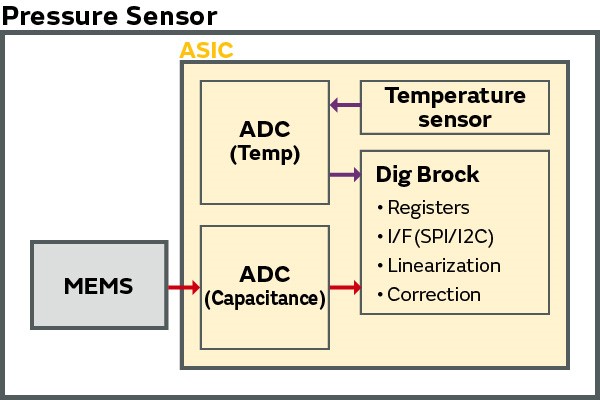
In general, capacitive versions of this sensor are superior for their low noise and low power consumption current. Barometric pressure sensors use a capacitive type, converting the capacitance value between the diaphragm and electrodes to an atmospheric pressure value. Capacitive MEMS are known for low current consumption and low noise. The ASIC interior contains a temperature sensor which outputs a temperature compensated atmospheric pressure value. They are also compatible with I2C/SPI digital interface by using built-in ADC and filter.
A barometric pressure sensor is a sensor that detects atmospheric pressure. Various types of pressure sensors exist utilizing different materials and methods among these Piezo-Resistive Type Barometric Pressure Sensor is one of the most popular one which is explained here.
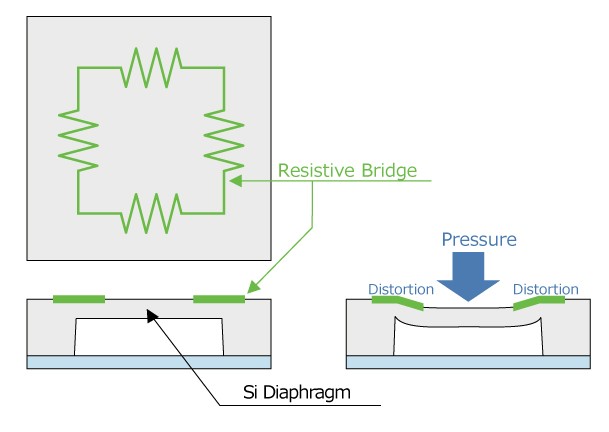
Piezo-resistive pressure sensors utilize a single Si crystal plate as a diaphragm and diffuses impurities on its surface to form a resistive bridge circuit, making it possible to calculate pressure (atmospheric) by detecting the resistance change resulting from distortion of this resistive bridge when pressure is applied.
The phenomenon in which the resistivity (electrical conductivity) changes based on the pressure applied to this resistance is called the piezoelectric effect and barometric pressure sensor shown here works on this principle. A piezoresistive pressure-receiving element (diaphragm structure that integrates a piezoresistor) with a temperature compensation function, control circuit, and other components in a single
package, making it easy to obtain atmospheric pressure information with high accuracy.
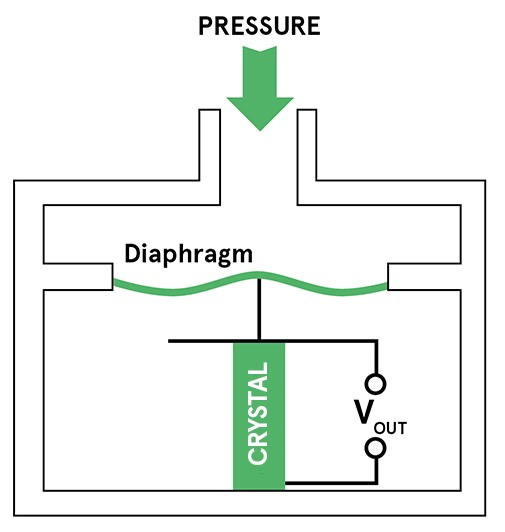
Another mechanism of pressure sensing is by using Piezo crystal with a diaphragm as shown. Due to atmospheric air pressure the diaphragm moves up or down depending on the pressure and Vout is proportional to pressure.
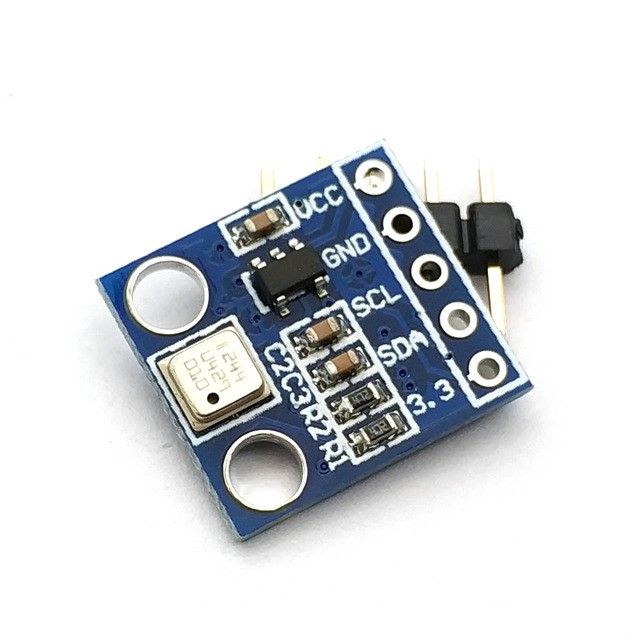
The BMP180 Barometer Sensor is a breakout board for Bosch BMP180 high-precision and low-power digital barometer. It can be used to measure atmospheric pressure accurately. It can be connected to Arduino UNO microcontroller with I2C or SPI interface.

This precision sensor is a precision sensing solution for measuring barometric pressure with ±1 hPa with absolute accuracy, and temperature with ±1.0°C accuracy. Because pressure changes with altitude and the pressure measurements are so good, you can also use it as an altimeter with ±1 meter accuracy. This graph shows atmospheric pressure verses Altitude. Even though the graph is not very much linear still if you know one parameter you can know the other.
BMP180 Atmospheric Pressure Sensor interfaced with Arduino:
The BMP180 module has six terminals. VCC & GND are connected to 3.3Volts and ground Pins of Arduino. BMP180 may be connected on I2C interface but resistance dividing network has to be used to reduce the SCL (clock) and SDA (Data) from 5 volts to 3.3 volts. SCL & SDA will be connected to Analog Pins A5 and A4 respectively. Additionally we need to use two LEDs and one Buzzer for indications and alarm as follows: The Green LED is connected to Arduino Pin 2 which will light up as soon as Arduino starts working. Red LED connected to Pin 3 and Buzzer connected to Pin 4 will go high as soon as Pressure crosses set limits.
BMP180 Atmospheric Pressure Sensor interfaced with Node MCU:
The BMP180 module has six terminals. VCC & GND are connected to 3.3Volts and ground Pins of Node MCU. BMP180 may be connected on I2C interface which means SCL (clock) and SDA (Data) are connected to GPIO5 SCL & GPIO4 SDA respectively of Node MCU. Additionally we need to use two LEDs and one Buzzer for indications and alarm as follows: The Green LED is connected to Node MCU Pin GPIO2 which will light up as soon as Node MCU starts working. Red LED connected to Pin GPIO3 and Buzzer connected to Pin GPIO4 will go high as soon as Pressure crosses set limits.
BMP180 Atmospheric Pressure Sensor interfaced with ESP32:
The BMP180 module has six terminals. VCC & GND are connected to 3.3Volts and ground Pins of ESP32. BMP180 may be connected on I2C interface which means SCL (clock) and SDA (Data) are connected to GPIO22 SCL & GPIO21 SDA respectively of ESP32. Additionally we need to use two LEDs and one Buzzer for indications and alarm as follows: The Green LED is connected to ESP32 Pin GPIO2 which will light up as soon as ESP32 starts working. Red LED connected to Pin GPIO3 and Buzzer connected to Pin GPIO4 will go high as soon as Pressure crosses set limits.
